Recipient
A package recipient is required when adding a package to IntelliTrack. A package recipient is an assignee who is designated as a Package Recipient (see "Assignees").
Adding a Recipient
A recipient is added to a division at the Manage Assignee page. To add a recipient, refer to the section that follows.
- Select Manage > Assignees from the navigation pane. The Manage Assignees page appears.
- Click the Add icon
 found directly above the Assignee grid, in the top right portion of it.
- The Add Assignee form appears.
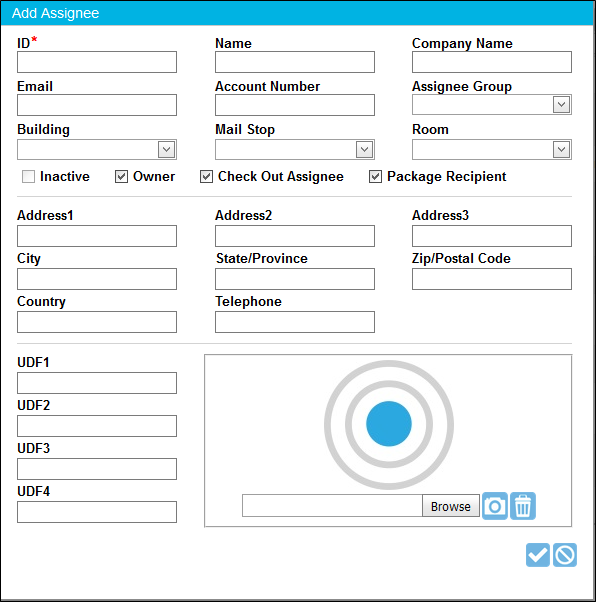
- Name field (required): enter the assignee name in this field.
- Company Name field (optional): enter the assignee's company name in this field.
- Email field (optional): enter the assignee's email address in this field.
- Telephone field (optional): enter the assignee's telephone number in this field.
- Account Number field (optional): enter the assignee's account number in this field.
- Assignee Group field (optional): this field is populated from the Assignee Groups lookup. To place this assignee in an assignee group, click the dropdown arrow and select an assignee group from the options available.
- Building field (optional): this field is available when the role of the logged-in user includes the Lookups Mailroom feature. This field is populated from the Buildings list at the Manage Buildings, Rooms, and Mail Stops page (see "Buildings, Mail Stops, Rooms" for more information on adding a mail stop to IntelliTrack). To associate this assignee with a building, click the dropdown arrow and select a building from the options available.
- Mail Stop field (optional): this field is activated after a building is selected; it is populated from the Mail Stops list at the Manage Buildings, Rooms, and Mail Stops page. To associate this assignee with a mail stop, click the dropdown arrow and select a mail stop from the options available. When an assignee is associated with a mail stop, a package may be delivered to the mail stop where the assignee (i.e., package recipient type) resides.
- Room field (optional): this field is activated after a building is selected; this field is populated from the Rooms list at the Manage Building, Rooms, and Mail Stops page. To associate this assignee with a room, click the dropdown arrow and select a room from the options available.
- Package Recipient checkbox (required to create a package recipient): available when the role of the logged-in user includes the Package Recipient feature. Mark this checkbox to create a package recipient.
- Inactive checkbox: Denotes an assignee's active status. When an assignee is active this checkbox is not marked. When an assignee is deactivated this checkbox is marked.
- When an assignee is inactive, this assignee will not automatically appear in the Assignee grid.
- An asset item cannot be checked out or reserved to an inactive assignee.
- A package cannot be assigned to an inactive assignee.
- Address 1 field (optional): enter the first address line in this field.
- Address 2 field (optional): enter the second address line in this field.
- Address 3 field (optional): enter the third address line in this field.
- City field (optional): pertains to the assignee address; enter the city in this field.
- State/Province field (optional): pertains to the assignee address; enter the state/province in this field.
- Zip/Postal Code field (optional): pertains to the assignee address; enter the zip/postal code in this field.
- Country field (optional): pertains to the assignee address; enter the country in this field.
- UDF1 field (optional): alphanumeric field, allows for custom information about the assignee.
- UDF2 field (optional): alphanumeric field, allows for custom information about the assignee.
- UDF3 field (optional): alphanumeric field, allows for custom information about the assignee.
- UDF4 field (optional): alphanumeric field, allows for custom information about the assignee.
- Picture (optional): add an item image in the Picture area of the form.
- Save icon: click to close the Add Assignee form and save this recipient assignee to the system. This recipient is added to the Manage Assignees page.
- Cancel icon: click to close the Add Assignee form and cancel adding this assignee to the system.