Buildings, Mail Stops, Rooms
Note: In order to reach this page, the role of the logged-in user must include the Lookups Mailroom feature.
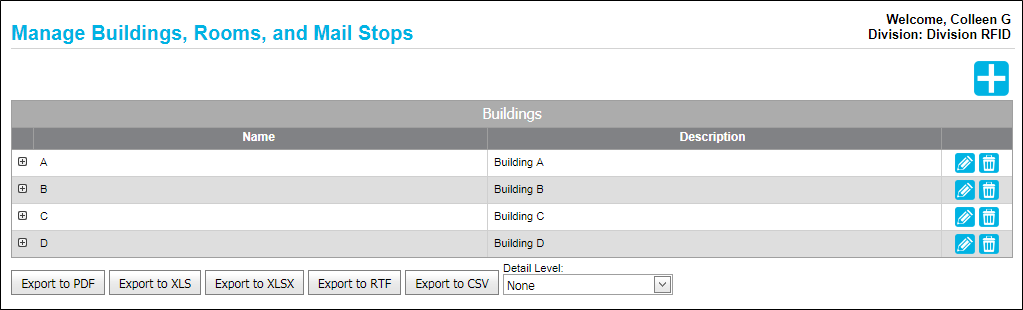
The building, mail stop, and room are recipient locations that identify where a recipient is located. The mail stop and room are added to a building. Once buildings, mail stops, and rooms are added to IntelliTrack, a recipient who is designated as a package recipient may be associated with them. Also, a package may be delivered to a mail stop when a recipient who has received packages is associated with the mail stop. To use buildings, mail stops, or rooms with your mailroom management solution, first add them to IntelliTrack. A building, room, or mail stop is added to the application at the Manage Buildings, Rooms, and Mail Stops page. Select Manage > Buildings to reach this page.
Adding a Building
First, add a building. Follow these steps to add a building.
- Select Manage > Buildings. The Manage Buildings, Rooms, and Mail Stops page appears.
- Select the Add button to place the page in Add mode. The Name field and Description field appear in the grid.
- Name field (required): Enter the building name in the Name field.
- Description field (optional): Enter the building description in the Description field.
- To save the building, press the Save button to close the Name and Description fields and save the building. (To cancel saving this building, press Cancel to close the Name and Description fields without saving the building.) You are now ready to add a mail stop or room to this building.
Adding a Mail Stop
A building may have a mail stop or mail stops. The mail stop for a building is placed in the Mail Stops and Rooms nested grid. A package may be delivered to a mail stop when the mail stop is associated with a recipient who has received packages (see "Delivering a Package to a Mail Stop").
Refer to the steps below to add a mail stop to a building.
- Select Manage > Buildings. The Manage Buildings, Rooms, and Mail Stops page appears.
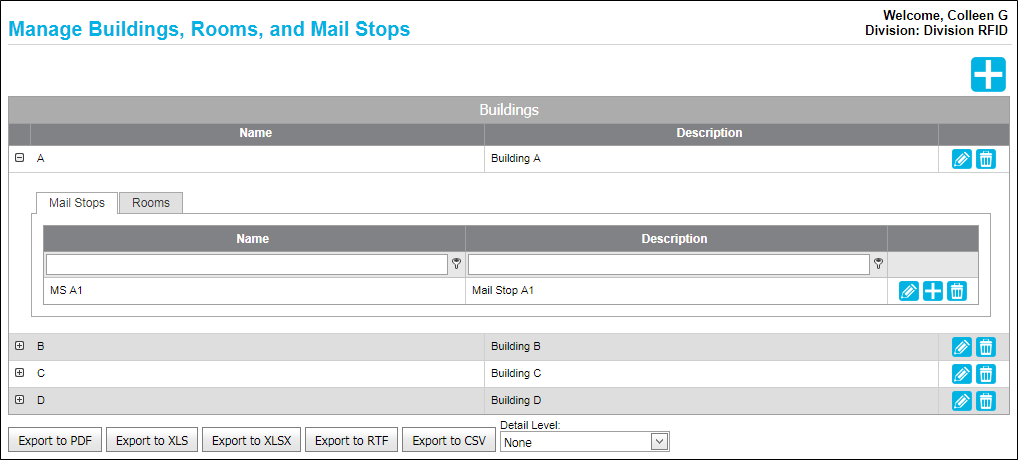
- Click the Expand icon for the building. The Mail Stops and Rooms nested grid appears.
- Click the Mail Stop tab to bring it to the front.
- Click the Add icon. The Name and Description fields appear.
- Name (required): Enter the mail stop name.
- Description (optional): Enter the mail stop description.
- Press Save to save the mail stop. (If you do not want to add this mail stop, press the Cancel button).
Adding a Room
A building may have a room or rooms. The room for a building is placed in the Mail Stops and Rooms nested grid.
Refer to the steps below to add a room is added to a building.
- Select Manage > Buildings. The Manage Buildings, Rooms, and Mail Stops page appears.
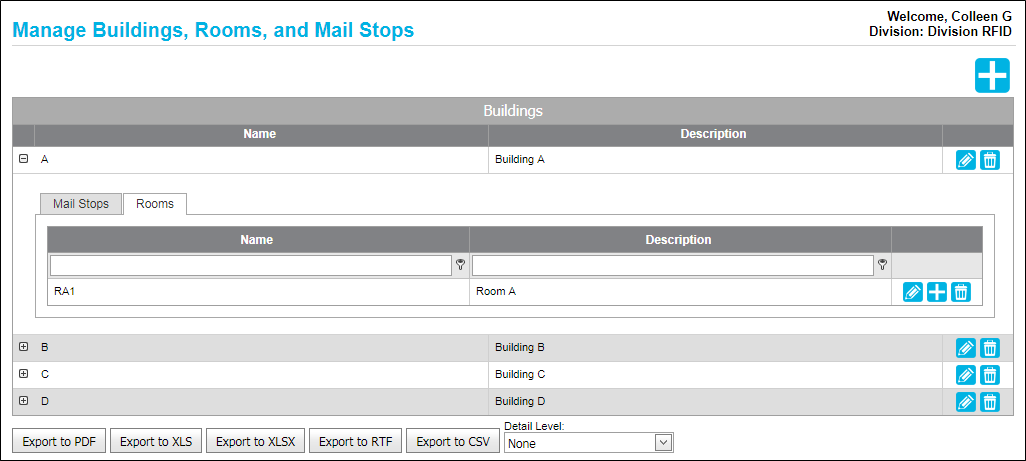
- Click the Expand icon for the building. The Mail Stops and Rooms nested grid appears.
- Click the Room tab to bring it to the front.
- Click the Add icon. The Name and Description fields appear.
- Name (required): Enter the room name.
- Description (optional): Enter the room description.
- Press Save to save the room. (If you do not want to add this room, press the Cancel button).
Editing a Building
Follow these steps to edit a building:
- At the Manage Buildings, Rooms, and Mail Stops page, select the Edit button for the building that you want to edit.
- The Building name and description fields are placed in Edit mode.
- Name field: change the building name.
- Description field: change the building description.
- Press the Save button to save the change or changes to the building; or press the Cancel button to discard editing the building. The Name field and the Description field collapse and you are returned to the page’s grid.
Editing a Mail Stop
The mail stop is edited via the nested grid for the building where it resides.
- Click the Expand icon for the building; the Mail Stops and Rooms nested grid appears.
- From the nested grid, click the Mail Stop tab to bring it to the front.
- Click the Edit icon for the mail stop that you want to edit. The Name and Description fields appear underneath.
- Click in the Name field to make a change to the name.
- Click in the Description field to make a change to the description.
- Click the Save button to save the change and return to the nested grid; or, to discard any change, click the Cancel button to discard the change and return to the nested grid.
Editing a Room
The room is edited via the nested grid for the building where it resides.
- Click the Expand icon for the building; the Mail Stops and Rooms nested grid appears.
- From the nested grid, click the Room tab to bring it to the front.
- Click the Edit icon for the room that you want to edit. The Name and Description fields appear underneath.
- Click in the Name field to make a change to the name.
- Click in the Description field to make a change to the description.
- Click the Save button to save the change and return to the nested grid; or, to discard any change, click the Cancel button to discard the change and return to the nested grid.
Deleting a Building
Note: When a building is in use, it cannot be deleted.
Important: When a building is deleted, any mail stop or room that resides in the building are also deleted.
Follow these steps to delete a building:
- At the Manage Building, Rooms, and Mail Stops page, select the Delete button for the building that you want to delete.
- A prompt appears, Delete Building?.
- Click OK to close the prompt and delete the building; or click Cancel to close the prompt without deleting the building.
- If you click OK and the building is not in use, it is removed from the grid.
- If you click OK, and the building is in use, a prompt appears to notify you that the building is in use and cannot be deleted. Click OK to close this prompt and return to the page. The building is not deleted.
- If you click Cancel the prompt closes and the building remains.
Deleting a Mail Stop
Note: When a mail stop is in use, it cannot be deleted.
A mail stop is deleted via the nested grid for the building where it resides.
- Click the Expand icon for the building.
- From the nested grid\Mail Stops tab, click the Delete button for the mail stop that you want to delete.
- A prompt appears, Delete Mail Stop?.
- Click OK to close the prompt and delete the mail stop; or click Cancel to close the prompt without deleting the mail stop.
- If you click OK and the mail stop is not in use, it is removed from the grid.
- If you click OK, and the mail stop is in use, a prompt appears to notify you that it is in use and cannot be deleted. Click OK to close this prompt and return to the page. The mail stop is not deleted.
- If you click Cancel the prompt closes and the mail stop remains.
Deleting a Room
Note: When a room is in use, it cannot be deleted.
A room is deleted from the nested grid for the building where it resides.
- Click the Expand icon for the building.
- From the nested grid\Rooms tab, click the Delete button for the room that you want to delete.
- A prompt appears, Delete Room?.
- Click OK to close the prompt and delete the room; or click Cancel to close the prompt without deleting the room.
- If you click OK and the room is not in use, it is removed from the grid.
- If you click OK, and the room is in use, a prompt appears to notify you that it is in use and cannot be deleted. Click OK to close this prompt and return to the page. The room is not deleted.
- If you click Cancel the prompt closes and the room remains.