Adding a Picking Order
A picking order is an outbound order to a customer. It consists of basic order information such as an order number, order date, customer, and carrier as well as line items to be picked. To add a picking order to the system, follow the steps below.
- Select Orders > Picking Order.
- The Picking Orders page appears.
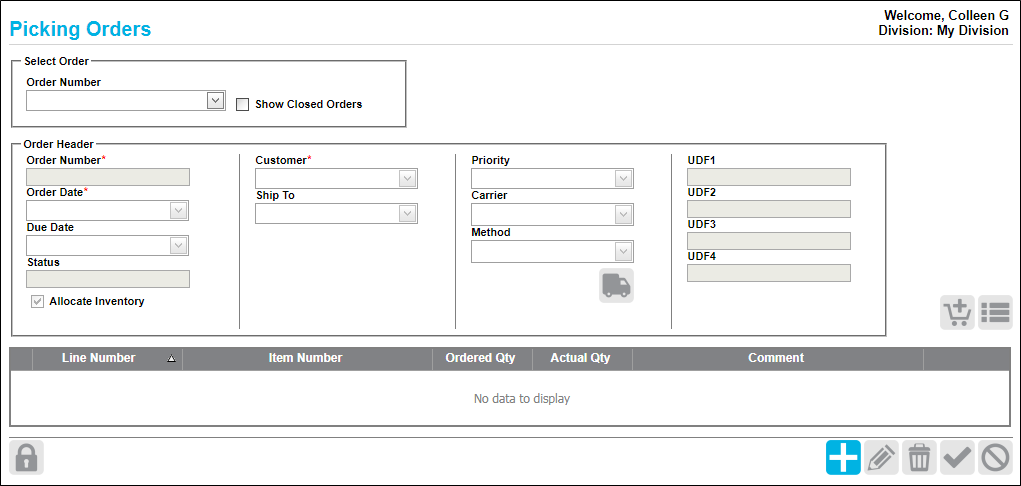
- To add a new picking order, select the Add icon found in the bottom right section of the page.

- The page is placed in Add mode.
Once in Add mode, you are able to add the required parts to the order:
- Order Header; see "Order Header" for more information.
- Order Details; see "Order Detail" for more information.
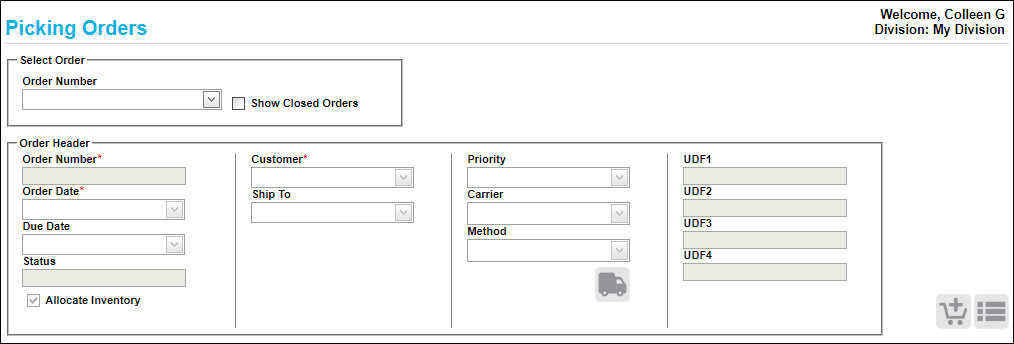
Order Header
Enter the basic order information in the Order Header section of the page:
- Order Number (required): If your division is set for automatic picking order numbering, the system automatically enters a Picking Order number in the Order Number field. If your division is not set for automatic picking order numbering, an order number must be entered in the Order Number field. The picking order number must be unique. The order number settings are set in the Division form; see "Division Orders Options" for more information.
- Order Date (required): The order creation date; defaults to today's date. If you want to change this date, click the drop-down arrow in the Order Date field and select the date from the calendar control that appears.
- Due Date (optional): The order due date. If you want to give this order a due date, click the drop-down arrow in the Due Date field and select the date from the calendar control that appears.
- Status: whether the order is open or closed; this field is read-only and is automatically added by the system.
- Allocate Inventory: appears when the inventory allocation is being used. If the Allocate Inventory for all Orders option is being used, this checkbox is automatically marked and cannot be edited. If the Allocate Inventory option is being used, this checkbox is not automatically marked: the user must mark this checkbox in order to allocate inventory for this picking order.
- Customer (required): the customer who is requesting the items; the available customers are pulled from the customers list loaded into the system at the Manage Customers page (see "Customers"). Click the drop-down arrow in the Customer field and select the customer from the list that appears. If the list is empty, it is because the Customer list is empty.
- Ship To (optional): the ship-to address for the order's customer; the available ship-to addresses are pulled from the custom's ship-to addresses (see "Customer Ship-To Addresses"). Click the drop-down arrow in the Ship To field and select the ship-to address from the list that appears. If this list is empty, it is because the ship-to address list for the selected customer is empty.
- Priority (optional): click the drop-down arrow in the Priority field and select the order priority from the list that appears: None, Low, Normal,High. If you do not select a priority, the system automatically sets it to None.
- Carrier (optional): the shipping carrier associated with this picking order; the available carriers are pulled from the carrier list loaded into the system at the Manage Carrier and Shipping Methods page (see "Carriers"). Click the drop-down arrow in the Carrier field and select the carrier from the list that appears. If the system carrier list is empty, this drop-down list will be empty.
- Method (optional): the shipping methods for this carrier; the available methods are pulled from the list of shipping methods added to this carrier (see "Shipping Methods"). Click the drop-down arrow in the Method field and select the shipping method from the list that appears. If this list is empty, it is because the Method list for this carrier is empty.
- UDF 1-UDF 4 (optional): alpha-numeric text fields; enter any special information about this issue in the UDF 1 through UDF 4 fields.
Once the order's header information is added, you are ready to add the line item or line items to the order; see "Order Detail".
Order Detail
An order detail is an item to be picked. It is added to the detail portion of the page.
Note: At least one detail must be added to the order in order to save the order.
- To add a detail, click the Add Detail icon, found directly above the Details grid.

- An order line is added to the order detail.
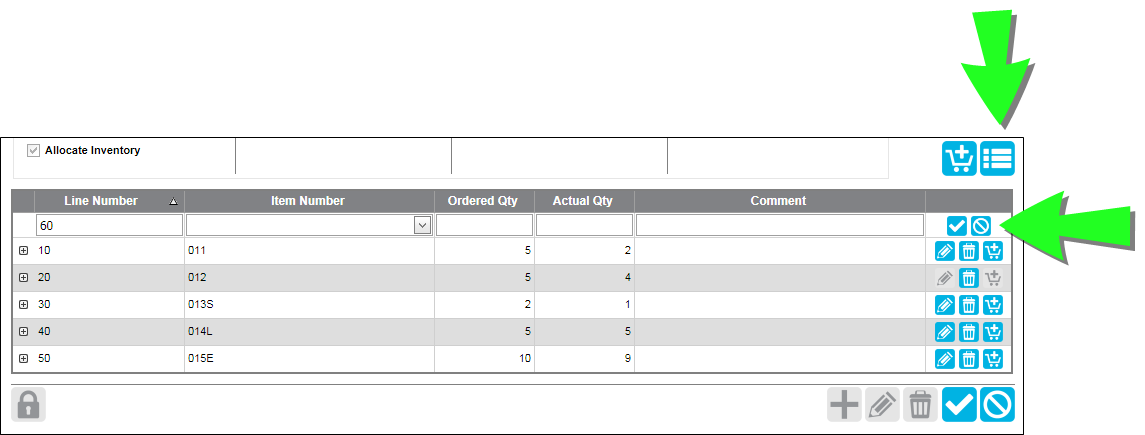
- Line Number: numeric identifier for each order line. Depending on the line number setting for picking orders, the line number is system generated or must be manually entered. Please note that the line number cannot be duplicated within the order. This is set at the Division form; see "Division Orders Options" for more information. The order must have at least one line item in order to save it.
- Item Number: item to be picked. Click the drop-down arrow in the Item field and select from the list of items in this division.
- Ordered Qty: total ordered quantity of this line item; enter the amount in this field.
- Actual Qty: actual pick quantity of this line item; placed in this field when the item is picked from inventory at the Pick Inventory form.
- Comment: enter any comments about this item in this field.
- To save the line item to the order, click the Save icon found to the right of the line item.

- The line item is saved to the order.

- If the inventory is being allocated for this order, the ordered quantity is allocated to the order when the line item is saved.
- If there is sufficient existing inventory to fulfill the item, the item is added to the order.
- If there is insufficient existing inventory to fulfill the item, the user is warned that there is insufficient quantity to fulfill the item; the maximum amount that can be allocated is displayed.
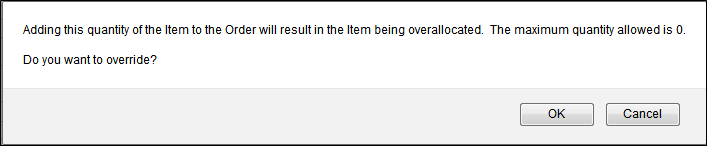
- The user may override the warning and add this amount to the ordered quantity by clicking the OK button. The user is returned to the Picking Orders page and the item is saved to the order.
- The user may adjust the ordered quantity to an amount that will not result in the item being over-allocated. To do so, the user must click the Cancel button to close the warning prompt. The user is returned to the Picking Orders page. The line item is still editable; it has not been saved to the order. The user may adjust the ordered quantity.
- Once a line item is saved to an order, you may edit it, delete it, or pick it via the icons to the right of the line item (for more information on working with the line items in an order, see "Picking Order Details".)

- At this point, you are ready to add another detail to the order; to do so, click the Add Detail icon.
- Add as many line items as required to complete the order.
Picking a Line Item
If you are ready to pick an item or all the items in the order, you are able to do so now. Each line item is picked individually at the Pick Inventory form and then it is added to the Actual Quantity in the line item. When the order is saved, this item will be picked from inventory.
 Click the Pick icon in the order line to reach the Pick Inventory form and pick this item; see "Picking an Item" for more information.
Editing a Line Item
When the picking order is in Add mode, you are able to edit a line item in the order by clicking the Edit icon  to the far right of the order line; see "Editing a Line Item" for more information.
Deleting a Line Item
When the picking order is in Add mode, you are able to delete a line item in the order by clicking the Delete icon  to the far right of the order line; see "Deleting a Line Item" for more information.
Saving the Order
When you are finished, click the Save icon along the bottom right of the page to save the entire order (header information and details), the order is saved to the system; any items that are ready to be picked are picked from inventory as well.

The page clears, indicating that the order has been saved to the system; any items that have been placed in the details for picking are picked from inventory. If all items are picked when the Save icon is pressed, the order is marked as "Closed."
Canceling the Order
When you are finished, if you do not want to place this order in the system, click the Cancel icon.

The page clears; this order is not added to the system.